Desktop Edge Deployment Guide
Caution
Table of Contents
- Server Installation and Server Configuration
- XMPP Installation and Configuration
- Admin Page Settings
- Appendix
1. Server Installation and Server Configuration
Open Firewall Information
-
A firewall distinguishes between information that is opened internally on the server and information that needs to be opened for external access.
-
Open Firewall Ports (Internal)
- 9090: openfire web console access port
- 5222: XMPP chat port (connection between server and work PC)
- 6222: SSH Port (Work PC -> Server Reverse Connection)
- 8080(80/443): Desktop Service Web server access port
- 9080: Desktop Service Configuration Page Access Port
-
Open Firewall Ports (External)
- 8080(80/443): Desktop Service Web server access port
- 5222(Optional): Open is required when using a public desktop, connection between the public desktop located externally and the server.
-
Check Open Firewall
$ sudo firewall-cmd --list-all
Check Server Installation Package
1) Copy (move) the shieldathome.tar.gz file to the /opt folder and extract it.
-
Unzip command
$ sudo tar -xvf shieldathome.tar.gz
2) Move to the extracted shieldathome folder
- Check package installation status
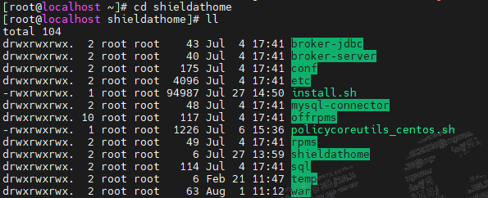
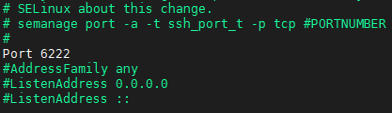
Changing SSH Port
- default 22the SSH port of the port6222Change to port
1) Install policycoreUtils
-
*CentOs Series
$ sudo yum install -y policycoreUtils-python -
*Ubuntu family
$ sudo apt-get install -y policycoreutils-python-utils -
*Closed Network Environment
-
Using the install file included in the package
$ /opt/shieldathome/policycoreutils_centos.sh -
2) Change sshd configuration
- vi /etc/ssh/sshd_config
- #Port 22 > Port 6222 (port change history reflected)
- semanage port –a –t ssh_port_t –p tcp 6222 (Execute command to change to port 6222)
- service sshd restart (restart sshd)
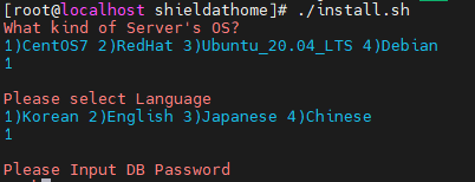
Run server installation script
-
Move to the server package location and execute the installation script
$ /opt/shieldathome/install.sh -
*After executing the script
- OS Selection
- Database Language Selection
- Setting Database Password (Must Read)
guacamole log rotate configuration
- Add logrotate configuration
$ vi /etc/logrotate.d/guacd
- Add the following content
/var/log/guacd.log
{
        daily
        rotate 30
        compress
        missingok
        dateext
        notifempty
        dateyesterday
}
- Creating a folder for scripts and moving files
$ sudo mkdir /usr/logrotate
$ sudo mv /etc/cron.daily/logrotate /usr/logrotate
$ ls /usr/logrotate
- Check that it is displayed as shown in the image below.

- Add crontab configuration
$ crontab -e
- Add the following content
0 0 * * * /usr/logrotate/logrotate
Replace SHIELDGate Desktop Agent file (if necessary)
- Move to the original file location
$ cd /opt/app/tomcat9/webapps/workathome/resources/new/
- Rename existing file (backup)
$ sudo mv SHIELDGateSetup.exe SHIELDGateSetup.exe_backup
- Move (copy) to the existing file location after uploading a new file
- Change New File Name
$ sudo mv 업로드파일명 SHIELDGateSetup.exe
Change Server Configuration File
- Change API Service Settings
$ sudo vi /opt/app/tomcat9/webapps/workathome/WEB-INF/classes/properties/server.properties
- jdbc.password
- Check if the entered password is correct.
- internal.ipaddr=xxx.xxx.xxx.xxx
- Enter the internal IP of the server
- SHIELDGate.OAuth.clientId
- SHIELDGate.OAuth.secretKey
- SHIELDGate.OAuth.masterExtra
- Filling in the information for the master tenant SHIELDGate app created in IdGP
- SHIELDGate.OAuth.apiUrl
- Enter IdGP server address
- SHIELDGate.OAuth.extra
- Enter the company id of the registered company.
- SHIELDGate.OAuth.appClientId
- Enter the SHIELDGate app ID within the company
- SHIELDGate.Oauth.logUrl
- Enter the integrated log server address
- root.SHIELDGateUrl
- Enter SHIELDGate server address
- *Additional Settings
- Screen logger usage setting (use true, do not use false)
- dxl=false
- *SHIELDGateSetup.exe's upload path is
/home/dxl/download/changed to
- root.useSrt
- Use of SRT
- Usage - 1, Not Used (RDP) - 0
- Change Web Service Settings
$ vi /opt/app/tomcat9/webapps/workathome/resources/static/config.js
- VUE_APP_SHIELDGATE_URL
- Enter SHIELDGate server address
- Server Restart
$ sudo systemctl restart tomcat
Check Server Normal Operation & Configuration
{서버주소}:8080(Web service port) access > Check normal page display
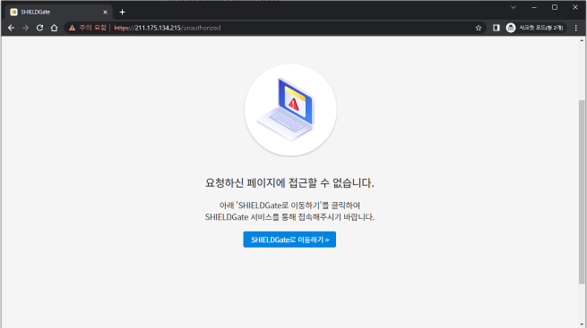
{서버주소}:9080(Settings Page) Access > Click "Login" Button
데이터베이스Tab Selection접속테스트Click the button to confirm normal database access
웹서버Tab Selection- Select whether to use SSL
- Upload certificate file and enter password when using
.keystoreUsing the format file
- Select whether to use port forwarding
- Forwarding Port When Using
443Input
- Forwarding Port When Using
적용하기Button Click
- Select whether to use SSL
로그아웃Tab Selection