Conditional Policy - Sender Menu Guide
※ Last updated: 2025-09-08
The conditional policies of SHIELD Mail are managed by distinguishing between sender policies and recipient policies based on the direction of mail flow (routing).
This is to clearly distinguish the document distribution paths before the conditional policy is applied, enabling more precise and predictable security controls.
Reason for Policy Separation
- Separate processing logic based on the direction of mail flow before applying conditional policies.
- Easy management of policy conflicts and policy priority through sender/receiver distinction.
Mail Routing Criteria
- Transmission: SOFTCAMP Mail Server → SHIELD Mail → External Mail Server
- Receiving: External Mail Server → SHIELD Mail → SOFTCAMP Mail Server
This guide explains how to configure sender policies and recipient policies separately in the conditional policy management menu within the admin page.
1. Entering the Conditional Policy Menu
Settings > Conditional Policies > SenderYou can access the policy management screen from the menu.
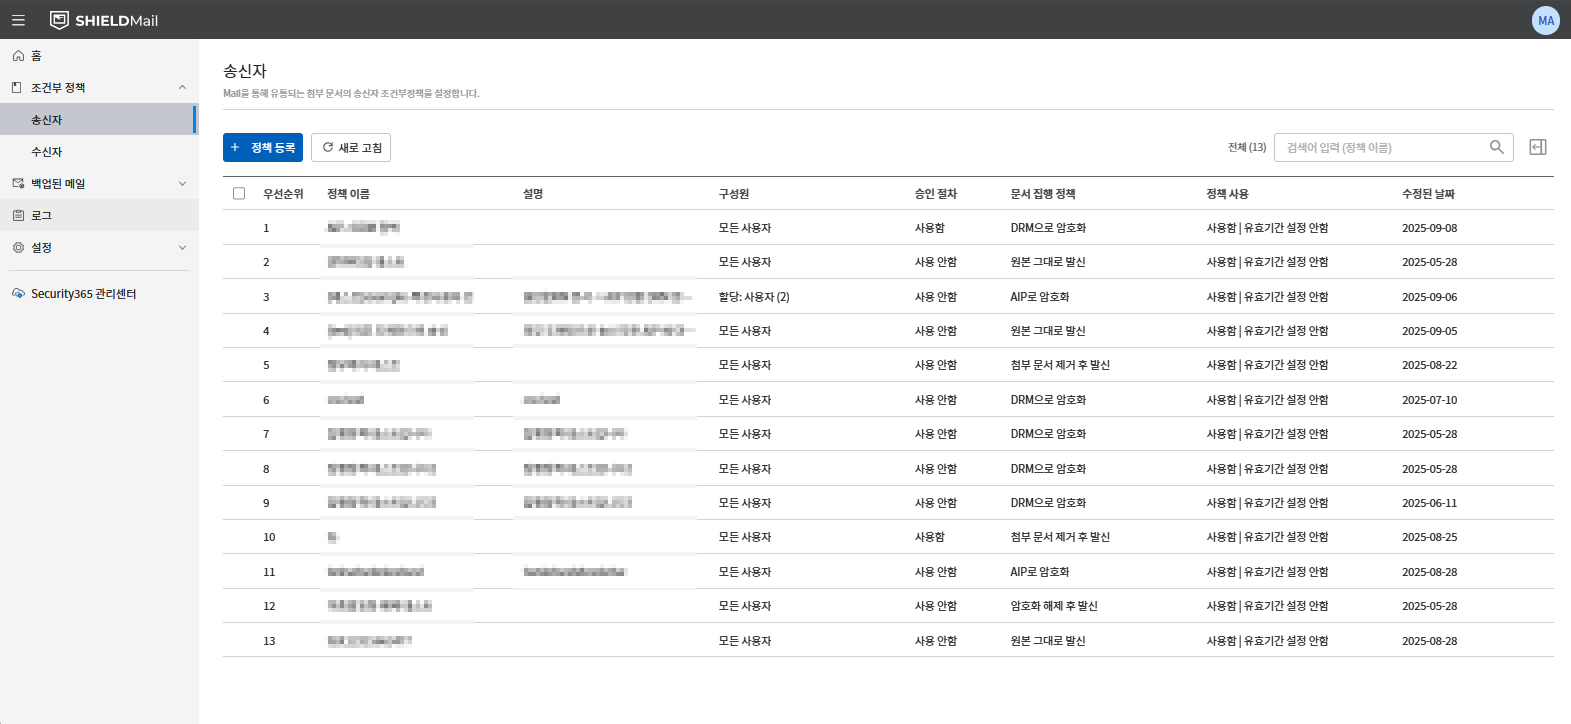
Policy List Table Structure
- **Priority:**Indicates the order of policy implementation.
- **Policy Name:**This is the unique name of the policy.
- **Description:**The purpose of the policy or a brief description.
- **Members:**Specifies the users, groups, or policy groups to which the policy applies.
- **Target document:**Types of documents to which the policy applies (General Document, DRM, AIP)
- **Condition:**Sender/Receiver conditions. (e.g:
softcamp.co.kr,user@softcamp.co.kr) - **Approval Process:**Specifies whether approval is granted.
- **Document Execution Policy:**This is the document processing method applied in the policy.
- **Revision Date:**This is the date when the policy was last modified.
2. How to Register Sender Conditional Policies
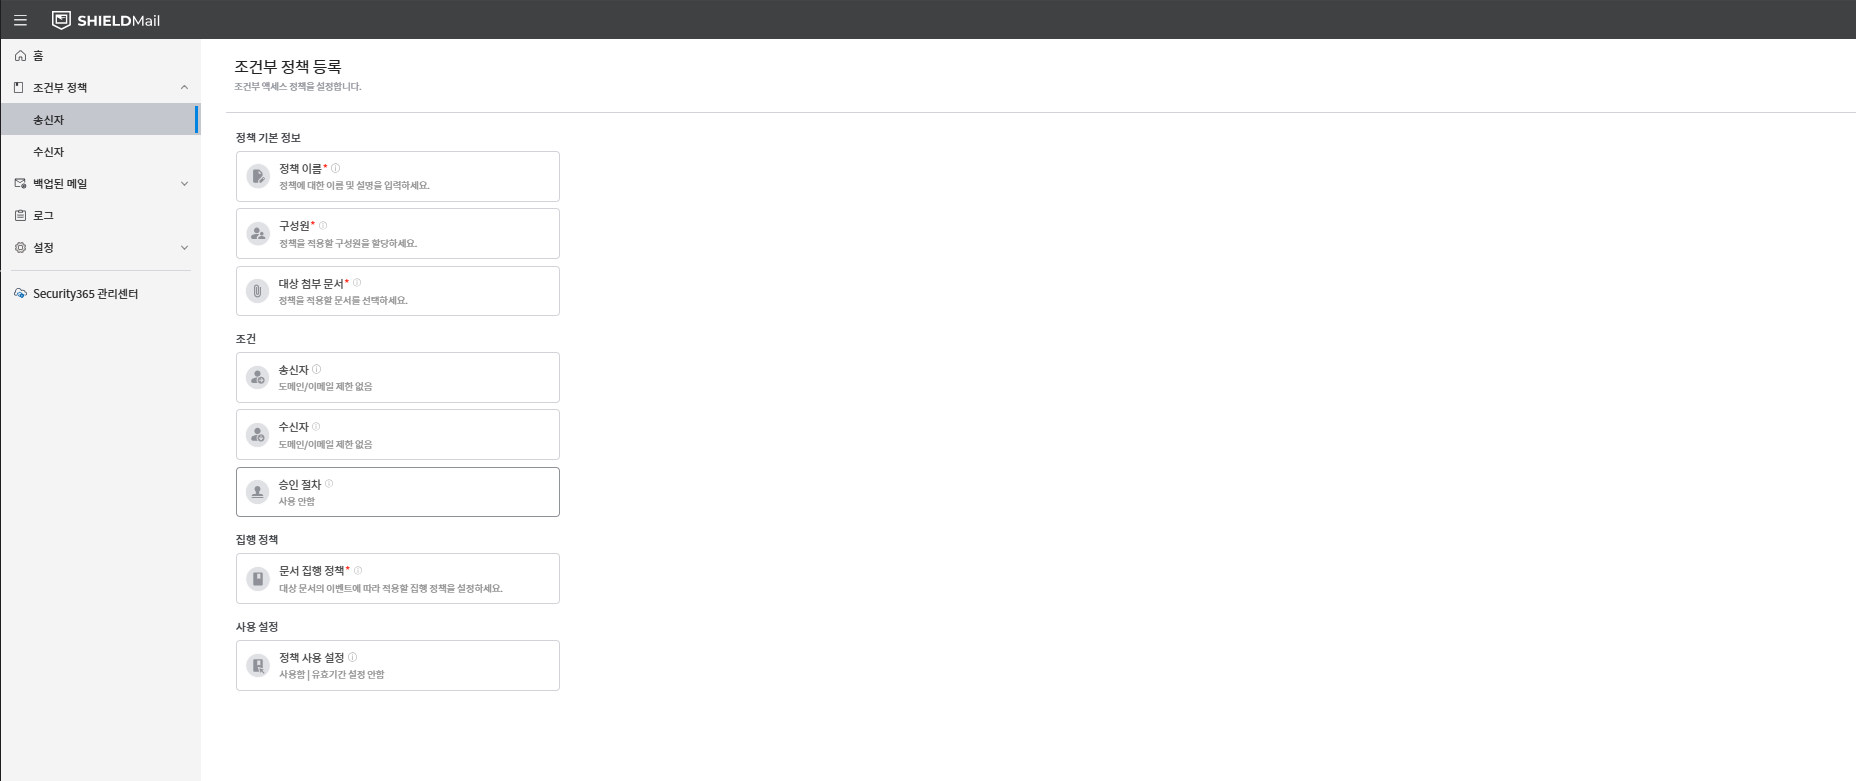
1. Policy Registration
Click the [Policy Registration] button to enter the policy creation screen.
2. Enter Basic Policy Information
- Policy Name (required): Enter the unique name of the policy.
- Policy Description: You can enter the purpose of the policy or a brief description.
- Member Designation (required) :
- Select the user or group to which the policy will be applied.
- [All users], specific users, groups, or policy groups can be specified.
- Specify attached file (target document type) (required) :
- Select the document type to which the conditional policy will be applied.
- Multiple selection available(e.g.: General Document + DRM Document)
- The available document types and supported extensions are as follows:
| Document Type | Description | Supported Extensions |
|---|---|---|
| General Document | Unencrypted plaintext document | doc,docx,docm,xls,xlsx,xlsb,xlsm,ppt,pptx,pps,ppsx,pptm,pdf,hwp,hwpx |
| DRM Document | Document Security(DS) based DRM applied document | doc,docx,docm,xls,xlsx,xlsb,xlsm,ppt,pptx,pps,ppsx,pptm,pdf,hwp,hwpx |
| AIP Document | Microsoft Azure Information Protection based document | doc,docx,docm,xls,xlsx,xlsb,xlsm,ppt,pptx,pps,ppsx,pptm,pdf |
hwp,hwpxis AIPNot supportedBe careful.
3. Setting Conditions
-
Condition items areSender Conditions, Receiver Conditions, Approval Processis composed of.
-
Sender Conditions
- No Limit
- Specify a specific domain (
softcamp.co.kr) - Specify a specific email (
admin@softcamp.co.kr)
-
Recipient Conditions
- No Limit
- Specify a specific domain (
gmail.com) - Specify a specific email (
user@gmail.com)
-
Approval Process
- Set it up to go through the designated approver's approval before sending.
- OFF: Immediately enforce the existing policy.
- ON: Calls the approval service API to send upon approval completion, and blocks in case of rejection.
- Usage Example:
- Approval from the security officer is required before sending important confidential documents.
- Control of the sending process by designating approvers by department
-
The method for entering sender/recipient conditions supports direct input, domain input, and CSV upload.
-
Note: This applies to all external emails when there are no conditions.
4. Document Execution Policy Settings
- Select the actual document processing method to apply based on the conditions.
- Selectable Policies:
- Send as is
- Sending after document conversion(DRM, AIP, etc.)
- Send after decryption
- Send after removing the attached document
- Blocking Email Sending
5. Policy Settings
- You can set the usage and validity period of the policy.
- Usage status: You can set the activation or deactivation of the policy through the toggle button.
- Expiration Date: You can specify a start date and an expiration date, and the expiration date
무기한You can set it to.
6. Save and Complete
- When all settings are complete,
저장Click the button. - Registered in the policy list, and thereafterEdit/DeleteIt is possible.
Edit Sender Conditional Policy
- You can click on the policy to edit in the policy list to change the detailed settings.
- When changing the order of policies, the priority is reset.
Caution
- For DRM and AIP documents, you need to check and configure the list of convertible file extensions.
HWP, HWPXThe extension AIP conversion is not supported.- Items with higher priority in the policy will be executed first.
Usage Example
- Convert attached documents encrypted with DRM to regular documents according to conditional policies (resolve the issue of not being able to view received attachments) Enhance security to ensure that files converted to regular documents for external transmission are not stored in the sent items or personal PCs.
Internal document link
It is scheduled for an update.