Outbound Server Installation and Configuration Guide
1) System Requirements
The hardware and software requirements to operate the SHIELD Edge Outbound Server are as follows.
| division | Applicable Specifications |
|---|---|
| CPU | Intel(R) Xeon(R) E-2234 3.6GHz / E-2134 3.5GHz / Silver 4112 3.0GHz or Similar Products |
| RAM | 1TB X 2(Raid) |
| HDD | 16GB or more |
| Hypervisor | Proxmox 8.0 or higher |
2) Preparation Requirements
Assuming that the hypervisor is already installed.
| No | division | Description | Note |
|---|---|---|---|
| 1 | Outbound Server installation OVA file | SdEdgeLink.mf SdEdgeLink.ovf SdEdgeLink-disk1.vmdk | Latest Release Version of Outbound Server |
| 2 | Public IP | IP for SFS Relay Server |
3) SHIELD Edge Outbound Server Installation
This document explains the installation of the SHIELD Edge OutBound Server (OVA) based on Proxmox.
3)-1. Upload SHIELD Edge Outbound Server OVF files (SdEdgeLink.mf, SdEdgeLink.ovf, SdEdgeLink-disk1.vmdk)
-
Connect to the corresponding node of Proxmox via ftp.
-
Upload the OVF file to /root.
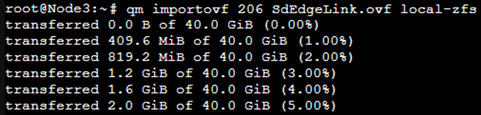
3)-2. Importing SHIELD Edge Outbound Server OVF File
-
Navigate to the folder where the OVF is uploaded and enter the command below (administrator privileges).
- Command example) qm importovf 206 SHIELDEdgelink.ovf local-zfs
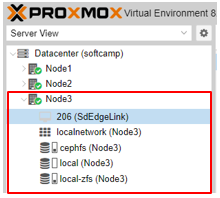
3)-3. Importing SHIELD Edge Outbound Server OVF File Verifying the creation of the VM for SHIELD Edge Outbound Server (206(SdEdgeLink))
- Once the import is successfully completed, the VM of SHIELD EdgeLink will be displayed as follows. This completes the installation.
4) SHIELD Edge Outbound Server Booting, Network Settings, and Console (Settings) Screen Display
This document explains everything from running to configuring after installation is complete.
4)-1. SHIELD Edge Outbound Server VM Booting
-
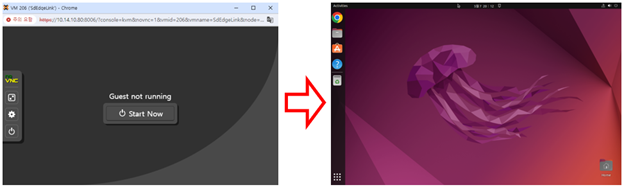
Clicking on VM 206 (SdEdgeLink) will display the Start Now button as shown in the right image.
-
Clicking the Start Now button will display the default OS, Ubuntu 22.04 Linux screen.
-
The booting of the SHIELD Edge Outbound Server begins. (It takes about 10 minutes.)
4)-2. Network settings for running the console screen of SHIELD Edge OutBound Server
-
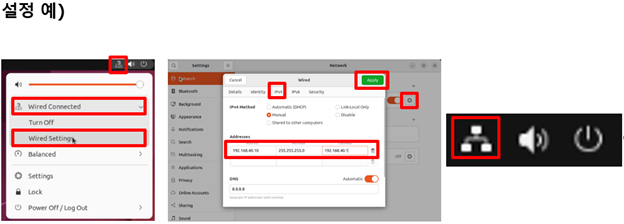
Set the local IP. Click the icon like '?' in the upper right corner and select 'Wired Connected' > 'Wired Setting'.
-
Click the gear icon in the Wired section to open the Wired popup, then navigate to IPV4 and click Manual. Enter the internal IP information (e.g., 192.168.40.10), Netmask, and Gateway.
-
Click the Apply button to reboot Ubuntu 22.04 Linux, and it will connect to the network. (Refer to the icon in the right image)
4)-3. SHIELD Edge OutBound Server Console Screen Display
-
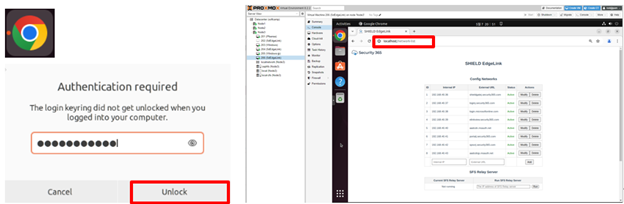
On the main screen of Ubuntu 22.04, click the Chrome icon on the left. Then, 'Authentication required' will be displayed, enter 'SOFTCAMP1!"' in the password input field and click Unlock.
-
Type 'localhost/network-list' in the Chrome browser's address bar and press Enter. Then, the SHIELD EdgeLink console will be displayed.
5) SHIELD Edge Outbound Server Console Screen Display, Default Values, and Operations
5)-1. Initial configuration values when the SHIELD Edge Outbound Server console screen is first displayed.
-
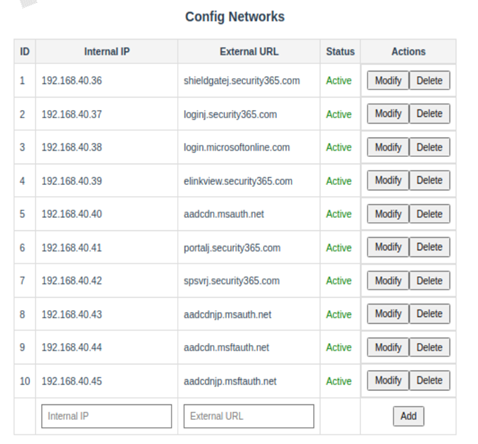
Config NetWorks Initial Configuration Values
-
The External URL and Internal IP required to access SHIELDGate are displayed.
-
Internal IP and External URL can be changed/deleted.
-
External URL item: Register the external site you want to link to.
-
Internal IP: Register the IP to access internally.
-
-
Initial Configuration Values for SFS Relay Server

-
The initial value is not set.
-
Enter the Public IP as the preparation item, then click the Run button.
※SHIELDEX Remote Browser management console requires Public IP settings.
① Access the SHIELDEX Remote Browser admin website.
https://elinkadmin.security365.com) Contact the administrator for ID/PW.② Select the "Policy" button in the LNB.
③ Select the "Edit" button on the right side of the "rbrowser" item in the list.
④ Among the settings, enter the "ICE server URL" item as follows.
- Configuration Example
{iceServers:\[{urls: 'turn:211.175.134.237:19001', username: ‘e\*\*\*\*\*\*', credential: ‘e\*\*\*\*\*\*\*\*\*'}\]}
-
-
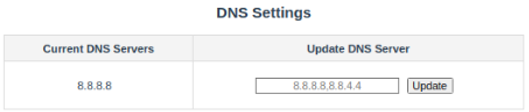
Initial DNS Settings
-
The initial value is 8.8.8.8.
-
It can be configured to match the network environment of the target for introduction.
-
-
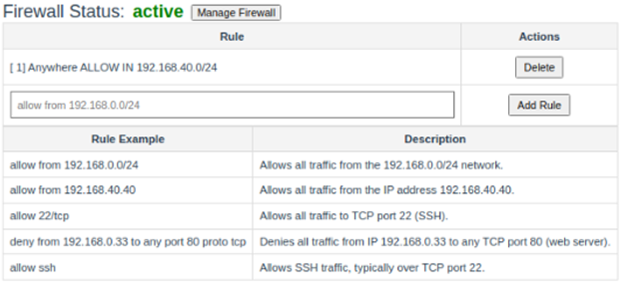
Firewall Status Initial Configuration Value
-
The initial value is "Anywhere ALLOW IN 192.168.40.0/24".
-
You can add or delete rules according to the network environment of the target for introduction.
-
-
Initial Settings for Toggle Host Display
- The Internal IP and External URL set in Config Networks are displayed.
6) Network Environment Configuration of the Target for Introduction
-
In order for the SHIELDGate screen to be displayed correctly, it is necessary to configure the network environment of the target for implementation (e.g., FireWall settings, etc.). Since various network environments exist depending on the implementation site, you can refer to the following examples.
-
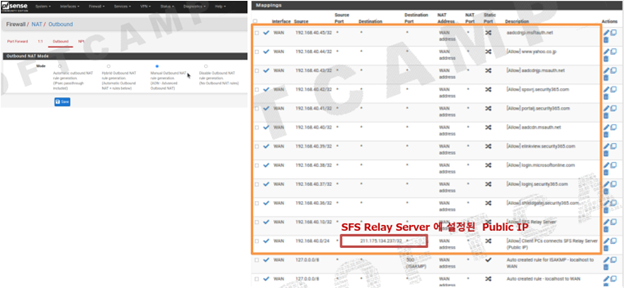
Firewall Configuration Example - pfsense
- Port Forward

- Outbound
7) Hosts file configuration on user PC
-
Enter the Internal IP and External URL set in Config Networks into the hosts file of the user's PC.
- Location: C:\Windows\System32\drivers\etc\hosts (configuration example)
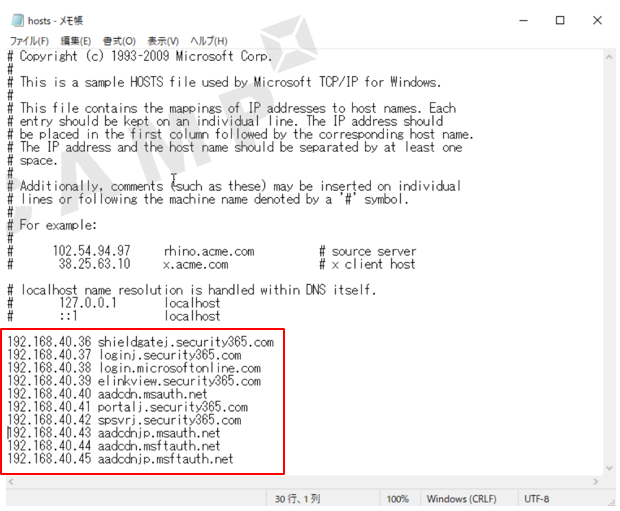
-
If managed with internal DNS at the introduction site, this Hosts file modification is unnecessary.
-
Initial Settings for Toggle Host Display