Settings
This is a menu where you can configure account settings, inbound provisioning, user authentication settings, log settings, logo settings, and enable features.
Table of Contents
Account Settings
- Setting Account Deactivation Period
- Password Rule Settings
- Bulk Change of All User Passwords (On-Premise Only)
- Session Automatic Logout Settings
- Recent Access Information
- Account Authentication Policy Settings
- Unused Account Automatic Deactivation Policy
Inbound Provisioning
- Microsoft 365 Sync Settings
- SCI Server Account Synchronization Settings
- Automatic Synchronization
- Instant Synchronization
- Check User Group Path on the Log Page
User Authentication Settings
Log Settings
Logo Settings
Settings
Account Settings
You can configure account deactivation period, password rules, automatic session logout, display of recent access information, account authentication policies, and more.
Setting Account Deactivation Period
If a user does not log in during the specified period, the account will be automatically deactivated.
- Disabled accounts can be reactivated from the user management menu.
Password Rule Settings
Users added through external account integration such as Microsoft and SAML are not subject to password rules.
| item | Description |
|---|---|
| Password Rule Settings | Set the required characters and minimum length for password creation and changes. |
| Setting Password Change Frequency | Set the frequency for changing the password. |
| Password Reuse Restriction | It restricts the reuse of the last N passwords. |
| Password Change Extension Settings | Set the number of times and the extension period that can be extended without changing the password. |
| URL to navigate when changing the password | Set the URL to redirect to after the password change is complete. |
| Setting User Initial Password | This is the initial password automatically issued to the user during manual registration (individual registration, CSV bulk registration). The user must change this password to a new one after the first login. |
**Password reuse restriction example:**If set to 2, the last 2 passwords used cannot be reused.
Bulk Change of All User Passwords
**This is an On-Premise exclusive feature.**In a cloud (SaaS) environment,
[비밀번호 일괄 변경]The button is not displayed.
Registered in the tenantReset all users' Security365 internal passwords at onceThis is a function. Within the password policy settings section사용자 초기 비밀번호under the item[비밀번호 일괄 변경]You will enter with a button.
The requester's own account is always excluded. For accounts synchronized with external systems such as SCI Server, Microsoft, etc.Only internal password for Security365It is initialized, and the password of the external system is not changed.
Comparison with the existing password reset feature
| Division | Email Initialization | Temporary Password Generation | Full Batch Initialization |
|---|---|---|---|
| Location | User List > Action Button | User List > Action Button | Settings > Password Policy Settings |
| Target | Selected Multiple Users | Single User | Entire Tenant |
| Initialization Method | Send reset link via email | Temporary password generation and delivery | Bulk set with the specified password |
| Processing Method | Motivation | Motivation | Asynchronous |
| Application Environment | Cloud / On-Premises | Cloud / On-Premises | On-Premise Only |
Input fields
[비밀번호 일괄 변경]A popup will be displayed when the button is clicked.
| item | Required | default value | Description |
|---|---|---|---|
| Change Password | ✅ | - | Guidelines for password rule settings will be displayed. |
| Password Confirmation | ✅ | - | 변경할 비밀번호You must enter it exactly as it is. |
| Excluding Administrator (ADMIN) | ❌ | Checked | Checking will exclude ADMIN role users from the target for changes. |
| Password change required on next login. | ❌ | Checked | When checked, it forces the user to change to a new password after their first login. |
Validation
| condition | Error Message |
|---|---|
| Password not entered | Please enter your password. |
| Password confirmation not entered | Please enter the password confirmation. |
| Password mismatch | The password does not match. |
| Password Policy Non-Compliance | Please check the password rule setting conditions. |
Only after passing validation
[초기화]The button is activated, and during the request processing, the button is deactivated.
Processing Action
[초기화]The request is immediately received when the button is clicked, and the popup closes.- Actual password change is**Background (Asynchronous)**It is processed, and for large-scale tenants, it may take several minutes to complete.
- In case of an error, the popup will remain and display the error message.
Exclusion Targets
| condition | Action |
|---|---|
| Your Account | always exclude |
| ADMIN Role | 관리자(ADMIN) 제외Exclude on check (Default: Checked) |
Guide Message
| Situation | Message |
|---|---|
| Immediately after request receipt | The entire password reset is in progress. |
| Processing complete | The complete password reset has been completed. |
| Failure (within popup) | A temporary error has occurred. Please contact the administrator. |
Session Automatic Logout Settings
It is set to automatically log out after a certain period of inactivity or if simultaneous access occurs. Individual settings are possible for each service, and it applies to the management center / SHIELD Drive / SHIELD Gate.
Unused Automatic Logout
If no mouse or keyboard input is detected for a set period of time, you will be automatically logged out of the service. This applies only to services where the toggle is enabled.
Default Logout Time
기본 로그아웃 시간Selecting a time from the dropdown will apply uniformly to all services.- You can individually change the logout time via the dropdown in each service.
- Time options: 10 minutes (default) / 30 minutes / 1 hour ~ 12 hours (in 1 hour increments)
Service-specific settings
- You can individually set the activation status of unused automatic logout using the toggle for each service row.
- Services with toggles disabled will have the dropdown disabled, making time selection unavailable.
- Only the currently subscribed services (Management Center, SHIELD Drive, SHIELD Gate) are displayed.
User Screen When Logout Occurs
지정된 시간 동안 활동이 감지되지 않아 보안을 위해 자동으로 로그아웃되었습니다.
다시 로그인하여 서비스를 이용해 주세요.
[다시 로그인]
Automatic Logout for Concurrent Sessions
If a new connection occurs from a different IP with the same account, the existing connection session will be automatically terminated. Since it is an IP conflict detection method, only service-specific toggles are provided without time settings.
Service-specific settings
- You can individually set the activation status of automatic logout for simultaneous connections using the toggle for each service row.
- Only the currently subscribed services (Management Center, SHIELD Drive, SHIELD Gate) are displayed.
User Screen When Logout Occurs
동시 접속으로 인해 로그아웃되었습니다.

다른 위치에서 동일 계정으로 접속하여 보안을 위해 자동으로 로그아웃되었습니다.
본인이 접속한 것이 아닌 경우 즉시 비밀번호를 변경해주세요.
[다시 로그인]
Recent Access Information
You can configure the management center to display the date and time of the user's last access and the IP address when logging in.
Account Authentication Policy Settings
You can set a policy to temporarily lock accounts when user authentication fails. Once the configured number of failures is reached, the account will be automatically locked and will be automatically unlocked after a specified time.
| item | Option |
|---|---|
| Number of authentication failures | 5 times / 10 times / 15 times |
| Account Lockout Duration | 5 minutes / 10 minutes / 30 minutes / 60 minutes |
- A locked account will be restricted from logging in until the set time, even if the correct password is entered.
Applies only to manual login users who do not use SSO (Single Sign-On).
Unused Account Automatic Deactivation Policy
**Menu Access:**Security 365 Management Center > Settings > Security Policy > Inactive Account Automatic Deactivation Policy
This is a policy that automatically deactivates user accounts that have not been accessed for a certain period. Automatic deactivation is performed daily based on the set period. Admin accounts are excluded from this process.
| item | Description |
|---|---|
| Automatic Deactivation of Inactive Accounts | Use / Unused Selection (Default: Unused) |
| Deactivation Criteria Period | Days elapsed since last access (default: 90 days, enter an integer of 1 or more) |
미사용The duration input field will be disabled when selected.저장When clicked, the settings will be applied, and a success/failure toast message will be displayed.
Inbound Provisioning
You can synchronize personnel information (users, groups) registered on the SCI server with Microsoft 365. You can also set up automatic synchronization according to a specified cycle and time.
Microsoft 365 Sync Settings
Synchronization Method
| Method | Description |
|---|---|
| Full Synchronization | Synchronize all AD groups and user information registered with the Microsoft account. |
| Synchronization of Specified AD Groups | Only the groups and members selected by the administrator will be synchronized. Groups and members that are not selected will be deleted. |
사용자, 그룹User and group information manually entered in the menu will not be deleted due to synchronization.
How to configure synchronization settings for a specified AD group
AD 그룹 관리of그룹 선택Select the group to synchronize by clicking the button.구성원 보기You can check the subgroups and member information of the group selected by the button.- It will be synchronized along with the subgroups.
확인Click the button to check the selected group information.- bottom
저장Click the button to apply the settings.
Group Type
보안 그룹or메일 그룹Only groups registered as __PH_0__ will be synchronized. [Reference Document]
If you signed up manually without using Microsoft
전체 동기화:지금 동기화Link your MS account with the button.지정된 AD 그룹 동기화:AD 그룹 관리Link your MS account with the button.- After logging in with an MS account that has administrator privileges and receiving delegation, a connection success notification will be displayed.
- After saving synchronization settings
수동 동기화You can link the personnel information by clicking the button.
**Caution:**After successful account linking,
설정 > 사용자 인증 설정inSecurity365 인증 사용andCSP 인증 사용 > Microsoft 계정 인증You need to activate it for existing administrators to log in with a manual account.
SCI Server Account Synchronization Settings
SCI Server account synchronization will operate only when the SCI server integration settings are completed.
SCI Server Integration Settings
- Enter the IP and Port of the SCI server and
연동 테스트Check the linkage status with the button. - If the server's user ID is not in email format (such as employee number, text, etc.), you can set a domain to synchronize it in email format.
**Example:**domain
softcamp.comIf set to, the ID isgildong.hongin usergildong.hong@softcamp.comIt will be synchronized in the format.
Automatic Synchronization (Setting Synchronization Interval)
- Enable/disable automatic synchronization with the toggle switch.
- When you set and save the synchronization time, it will automatically synchronize at the set time every day.
Instant Synchronization
- bottom
수동 동기화Clicking the button will immediately execute synchronization based on the saved synchronization settings. - After synchronization is complete, the success/failure status and completion time will be displayed.
- If synchronization is in progress, it will not execute redundantly.
Check User Group Path on Log Page After Integration
경로 표시 기준 그룹 설정You can check the group path that the user belongs to on the log page based on the selected group using the options.
How to Set Up
설정 > 인바운드 프로비저닝Select a synchronization method. (Microsoft All / Specified Group / SCI Server)경로 표시 기준 그룹 설정Activate the checkbox.- Select a path-based group. (Applicable only for Microsoft Sync)
- Full Synchronization: The administrator directly sets one top-level root group.
- Designated Group SynchronizationThe groups selected as synchronization targets are automatically set as the top-level root groups.
- Executing synchronization. (Automatic synchronization or manual synchronization)
로그User in the menuDepartmentCheck the affiliation group path in the column.- Example: Path is
소프트캠프/영업�부문/영업1팀/홍길동in case소프트캠프,영업부문,영업1팀searchable by
- Example: Path is
Output Method by Synchronization Type
| Synchronization Method | Select Path Display Reference Group | Group Path Output Method | Special Notes |
|---|---|---|---|
| Microsoft Full Synchronization | possible | Output based on the selected group | Include all users of the entire tenant |
| Microsoft designated group synchronization | possible | Output including only the selected group | Cannot include users outside the selected group |
| SCI Server Synchronization | No direct selection required | Automatically output based on the top-level group | Structure where only one user's organization exists |
**Caution:**If the reference group is set incorrectly, some users may not see their group paths. The SCI Server automatically sets the top-level group, so no separate selection is required.
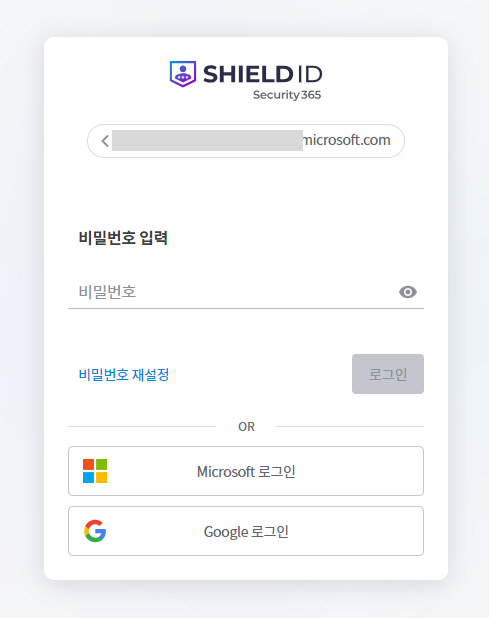
User Authentication Settings
You can configure the user login authentication method.
Using Security365 Certification
Users are authenticated with their Security365 ID and password. Manually registered users log in using this method.
Using CSP Authentication
Authenticate users with a Microsoft or Google account used in the organization.
| Authentication Method | Description |
|---|---|
| Microsoft account authentication | login page when usingMicrosoft 로그인The button will be activated. Users linked with Microsoft Sync can log in with their Microsoft account. |
| Google Account Authentication | login page when usingGoogle 로그인The button will be activated. |
If only Microsoft or Google account authentication is enabled, when entering the ID on the login page, you will be redirected to the login page of the linked service.
Using SSO Authentication (SAML)
SAML authentication is performed using the IdP managed by the organization. To use it, IdP configuration, SP configuration, and Redirect URL configuration are required.
If only SAML authentication is enabled, entering the ID on the login page will redirect you to the login page of that service.
If no authentication method is selected, you can use Security365 authentication / Microsoft account authentication / Google account authentication.
Log Settings
You can regularly back up log data and store/manage archive files.
Log Backup Settings
Log backups are automatically executed according to the configured standard time zone and backup frequency. If the stored files exceed the specified maximum number, the oldest files are automatically deleted.
Backup Cycle
| cycle | Description |
|---|---|
| every day | Backups are executed at the set time every day. |
| every month | Backups will be executed on the specified date and time each month. |
| every year | Backups are executed at the specified month, day, and time each year. |
Log Collection Period
Set the collection period of logs to be included in the archive file. The collection period starts from the day before the backup date and includes logs from the selected period.
**Example:**If you select "30 days" and the backup date is August 15, 2023, the logs will include from July 16, 2023, 00:00:00 to August 14, 2023, 23:59:59.
Archive File Management
아카이브 파일 개수: Sets the maximum number of archive files to be stored. If exceeded, the oldest files will be deleted.아카이브 파일 목록You can check the list of generated files and download them.
External Transmission of Backup Logs
The log backup files generated during use are automatically sent to the configured external storage.
| item | Description |
|---|---|
| SSH ID | Access Account ID |
| SSH PW | Access Account PW |
| IP | Remote server IP address |
| Port | Remote Server Port |
| Transmission Target Path | The absolute path where the log backup file will be stored (it will not be transferred if the path does not exist.) |
연결 테스트The save settings button will be activated only when the connection via the button is successful.
Automatic Deletion of Log Files
사용함: The backed-up original log will be deleted and cannot be recovered.사용 안함: The original logs are retained without being deleted.
Logo Settings
Login Page Settings
You can set the visibility of the logo and buttons displayed on the login screen.
| item | Description | Support Format / Specifications |
|---|---|---|
| Logo | Logo image to be displayed on the login page | PNG/SVG/JPG, recommended width 160~356px · height 34px, maximum 2MB |
| Favicon | Favicon image displayed in the browser tab | ICO/PNG, recommended 16×16 · 32×32, maximum 500KB |
| tab name | Browser tab title text | -, _, &Only special characters are allowed |
| Password Reset Button | on the login page비밀번호 재설정Button Hiding 처리 | - |
| Join Button (on-premises only) | on the login page등록하기Button Hiding 처리 | - |
- Change Image: Click the edit icon on the right after
이미지 변경Selection - Basic Image Restoration:
기본 이미지로 변경Click
Service-specific logo settings
You can set the GNB logo, browser tab name, and favicon to be displayed on each service screen. For services that are divided into administrator/user pages, you can set them separately.
| item | Description | Support Format / Specifications |
|---|---|---|
| GNB Logo | Logo image in the top header of the service console | PNG/SVG/JPG, recommended width 140px · height 30px, maximum 2MB |
| Favicon | Favicon image displayed in the browser tab | ICO/PNG, recommended 16×16 · 32×32, maximum 500KB |
| tab name | Browser tab title text | -, _, &Only special characters are allowed |
- Change Image: Click the edit icon on the right after
이미지 변경Selection - Basic Image Restoration:
기본 이미지로 변경Click
Settings
You can selectively display only the necessary menus according to the organization's usage environment and hide unnecessary menus to simplify the management screen.
Essential Menu
This is a menu that is always displayed. It cannot be hidden.
- User, Administrator, Group, License, Condition Items, Log, Settings
- System Monitoring (Displayed only in On-Premise environments)
The administrator and license menu is only displayed with super administrator privileges.
Selection Menu
This is a menu where you can choose whether to display or not.
| Menu | Description | When not in use |
|---|---|---|
| Home Menu | Home screen displaying the dashboard and overall status | Move to the first available menu on the first screen after logging in. |
| Security Classification Label | Menu for managing data classified by grade and label | - |
| Conditional Policy | Menu for managing login authentication policies by service | Accessible to all users with ID/PW authentication only. |
Whether to use the approval service
This is a service that centrally manages approval requests generated from linked services.
| Settings | Description |
|---|---|
| use | The approval service is activated, and the approval process proceeds according to the policies set in the linked service. |
| Not in use | The approval service is disabled, so the approval process cannot be used. The menu related to the approval service is also not displayed on the user page. |